Building Reusable Web Components with ReactJS: A Step-by-Step Guide
Abhay Pareek

Introduction
In the ever-evolving landscape of web development, the concept of reusability has become a cornerstone for efficiency and productivity. Web components have emerged as a powerful solution, enabling developers to encapsulate and share UI elements across various web applications seamlessly. Harnessing the capabilities of Create React App (CRA) and NPM packages, you can embark on a journey to create, develop, and distribute your very own web components. In this comprehensive guide, we’ll take you through the process step by step, unraveling the intricacies of crafting and publishing web components using ReactJS.
Throughout this guide, we’ll delve into the nuts and bolts of the process. We’ll explore how to create a web component from scratch using Create React App, integrate it with essential dependencies, and ultimately publish it as an NPM package for widespread use.
Getting Started
Step 1: Create a new React application using Create React App. If you’re using TypeScript, run the following command:
Step 2: Install the @r2wc/react-to-web-component package, which allows you to convert React components to web components:
You can also install any third-party packages you need, such as axios or Material-UI (@mui/material).
Developing The Web Component
Step 3: Create the component you want to use as a web component. For example, let’s create a component named Checklist that fetches and displays weather data:
import { Card, CardActionArea, CardContent, Typography } from “@mui/material”;
import React, { useState, useEffect } from “react”;
type Props = {
city: string;
color: string;
};
export default function Checklist({ city, color }: Props) {
const [temp, setTemp] = useState(”);
const [min, setMin] = useState(”);
const [max, setMax] = useState(”);
const [description, setDescription] = useState(”);
useEffect(() => {
getCityData(city);
}, [city, color]);
const getCityData = async (place:string) => {
const response = await fetch(
`https://api.openweathermap.org/data/2.5/weather?q=${place},IN&appid=ab195c619b782e8da6a7b54a5a4848f6&units=metric`
);
const res = await response.json();
setTemp(res.main.temp);
setMin(res.main.temp_min);
setMax(res.main.temp_max);
setDescription(res.weather[0].description);
};
return (
<>
<Card elevation={20} sx={{ maxWidth: 345 }}>
<CardActionArea>
<CardContent>
<Typography color={color} gutterBottom variant=”h5″ component=”div”>
{city}
</Typography>
<Typography variant=”body2″ color=”text.secondary”>
Temperature: {temp}
<br />
Min: {min}
<br />
Max: {max}
<br />
{description}
</Typography>
</CardContent>
</CardActionArea>
</Card>
</>
)
}
Step 4: Configure the src/index.tsx file to create a web component out of the CRA app:
import React, { FunctionComponent, useEffect } from ‘react’;
import * as ReactDOM from ‘react-dom/client’;
import reactToWebComponent from ‘react-to-webcomponent’;
import Checklist from ‘./components/checklist/Checklist’;
import r2wc from “@r2wc/react-to-web-component”
const WebComponentWrapper: FunctionComponent<{ city: string, color: string }> = ({ city, color }) => {
useEffect(() => {
console.log(“city: “, city);
console.log(“color: “, color);
}, [city, color]);
return (
<Checklist city={city} color={color} />
);
}
const wcChecklistShadow = reactToWebComponent(WebComponentWrapper, React, ReactDOM, {
dashStyleAttributes: true,
shadow: true,
});
const wcChecklist = r2wc(WebComponentWrapper, {
props: {
city: “string”,
color: “string”
},
});
customElements.define(‘custom-app-sachet’, wcChecklist);
customElements.define(‘custom-app-sachet-shadow’, wcChecklistShadow);
Step 5: Update the public/index.html to include your custom web component:
<my-custom-app city=”Kanpur” color=”red”></my-custom-app>
<my-custom-app city=”Bengaluru” color=”green”></my-custom-app>”>
Step 6: Start your development server and see your web component in action:
npm start
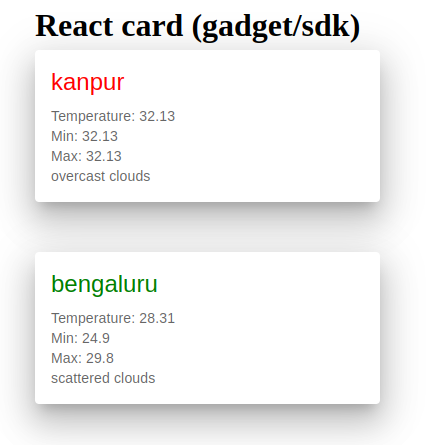
On http://localhost:3000/ you can see something like this:

Publishing The Web Component
Step 7: Open your package.json file and configure your package settings:
{ “name”: “my-custom-app”,
“version”: “0.1.0”,
“private”: false,
“homepage”: “/”,
“main”: “build/static/js/main.js”,
“module”: “build/static/js/main.js”,
}
Step 8: Build your app using the following command:
npm run build
Step 9: Log in to your NPM account using the following command:
npm login
Step 10: Verify your identity with:
npm whoami
Step 11: Publish your web component as an NPM package:
npm publish
Step 12: Once published, your package will be available on NPM. You can also create a CDN link using Unpkg:
“https://unpkg.com/my-custom-app/build/static/js/main.js”
Using The Web Component In An HTML Project
Step 1: Create an HTML file, e.g., index.html.
Step 2: Add the script tag in head to include your web component:
<script src=“https://unpkg.com/my-custom-app/build/static/js/main.js”></script>
Step 3: Use the web component in the HTML body:
<my-custom-app city=”Kanpur” color=”red”></my-custom-app>
<my-custom-app city=”Bengaluru” color=”green”></my-custom-app>
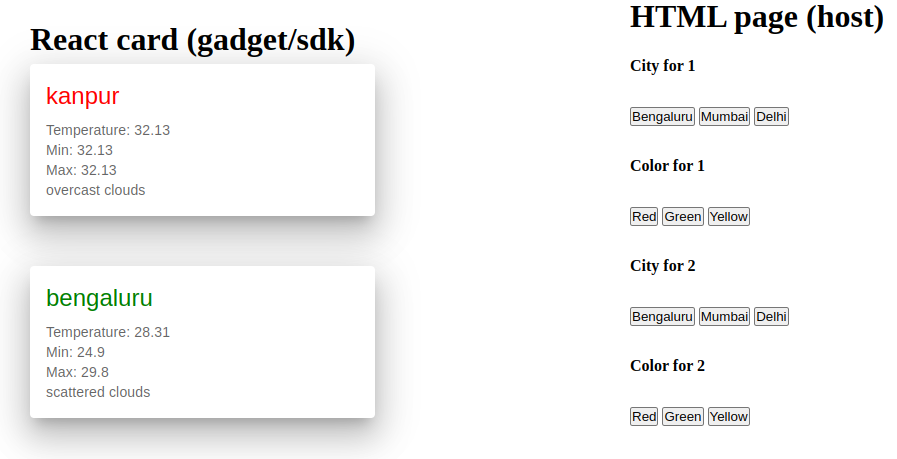
We can write functionality like this:

How To Use It In An Angular Project
Step 1: Add the script tag to the head of index.html of your Angular app:
<script src=”https://unpkg.com/my-custom-app/build/static/js/main.js”>
</script>
Step 2: Use the web component in the app.component.html:
<my-custom-app city=”Kanpur” color=”red”></my-custom-app>
<my-custom-app city=”Bengaluru” color=”green”></my-custom-app>
Congratulations! You’ve successfully created and published a web component using Create React App and NPM. This approach enhances code reusability and promotes sharing UI elements across different web projects.
Summary:
Web components offer a modular approach to front-end development, allowing you to encapsulate complex UI structures into self-contained, reusable packages. By leveraging ReactJS, one of the most popular and versatile JavaScript libraries, you can combine the power of component-based architecture with the flexibility of web components, unleashing a new realm of possibilities for your projects.


