Angular Best Practices for Scalable and High-Performance Applications

Angular Best Practices for Scalable and High-Performance Applications
Introduction
Staying current with Angular’s latest features is key to writing efficient, scalable, and maintainable applications. This blog covers the modern Angular techniques, including signals, defer blocks, lazy loading with preloading strategies, pure pipes, and proven best practices to help you optimize performance and keep your codebase clean. Angular version availability is noted for each feature. Each section includes examples, benefits, pitfalls, and version notes.
1. Use Angular Signals for State Management (Angular 16+)
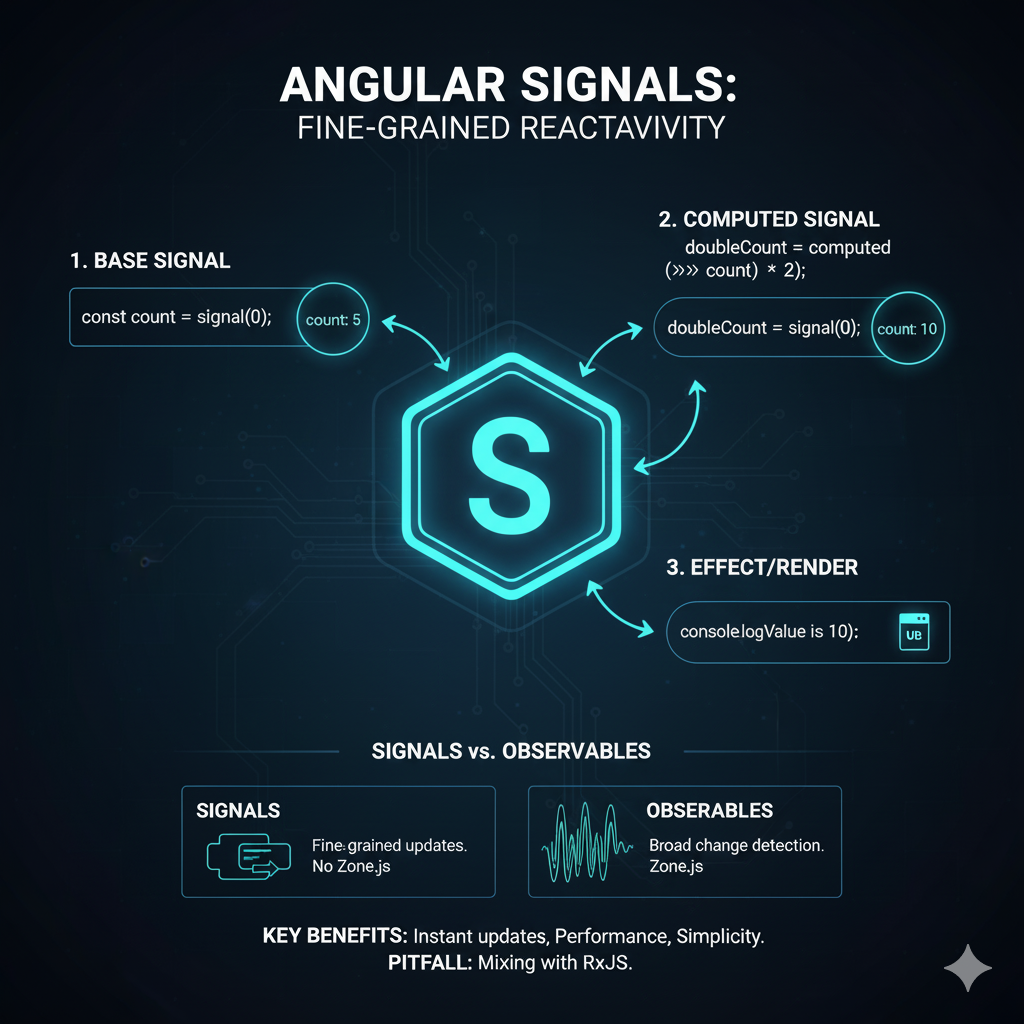
What are Signals?
Signals provide a fine-grained reactive way to manage state without triggering unnecessary change detection like traditional observables.
Example:
import { signal, computed } from '@angular/core';

 const count = signal(0);
 const doubleCount = computed(() => count() * 2);

 count.set(5);
 console.log(doubleCount()); // 10
Benefits: – Reduces boilerplate. – Avoids redundant re-renders. – Provides fine-grained reactivity.
Pitfalls: – Use signals consistently; mixing signals and RxJS in the same state tree can create complexity.
2. Use Defer Blocks for Lazy Rendering (Angular 17+)
What are Defer Blocks?
Defer blocks delay rendering of a component/template until conditions are met.
Example:
@defer (when isLoggedIn) {
   <dashboard></dashboard>
 } @placeholder {
   <p>Loading dashboard...</p>
} 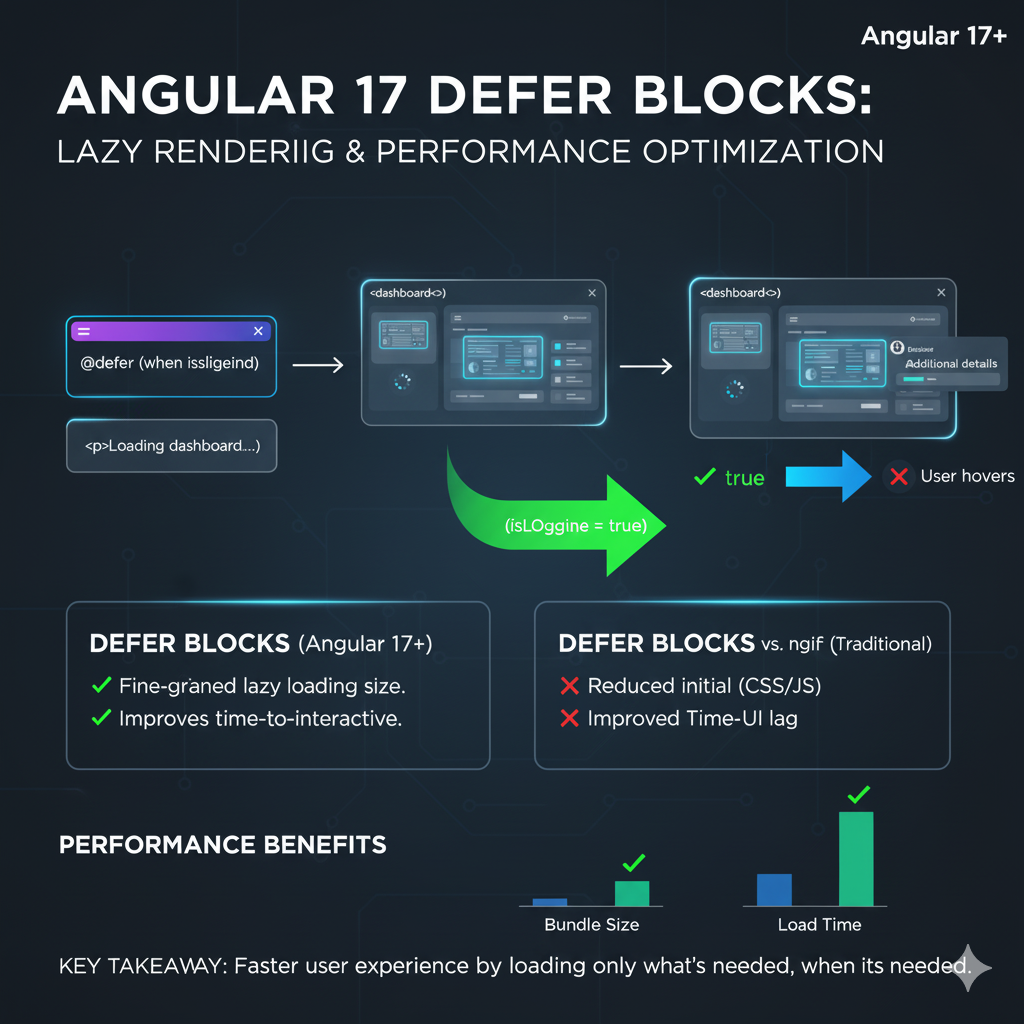
Benefits: – Reduces initial bundle size. – Improves time-to-interactive.
Pitfalls: – Avoid overusing defer on critical UI; users may perceive lag.
3. Avoid Importing Entire Libraries (All Angular Versions)
Import only what you need.
❌ Bad Practice:
import * as lodash from 'lodash';
 const result = lodash.cloneDeep(obj);
✅ Optimized:
import cloneDeep from 'lodash/cloneDeep';
 const result = cloneDeep(obj);
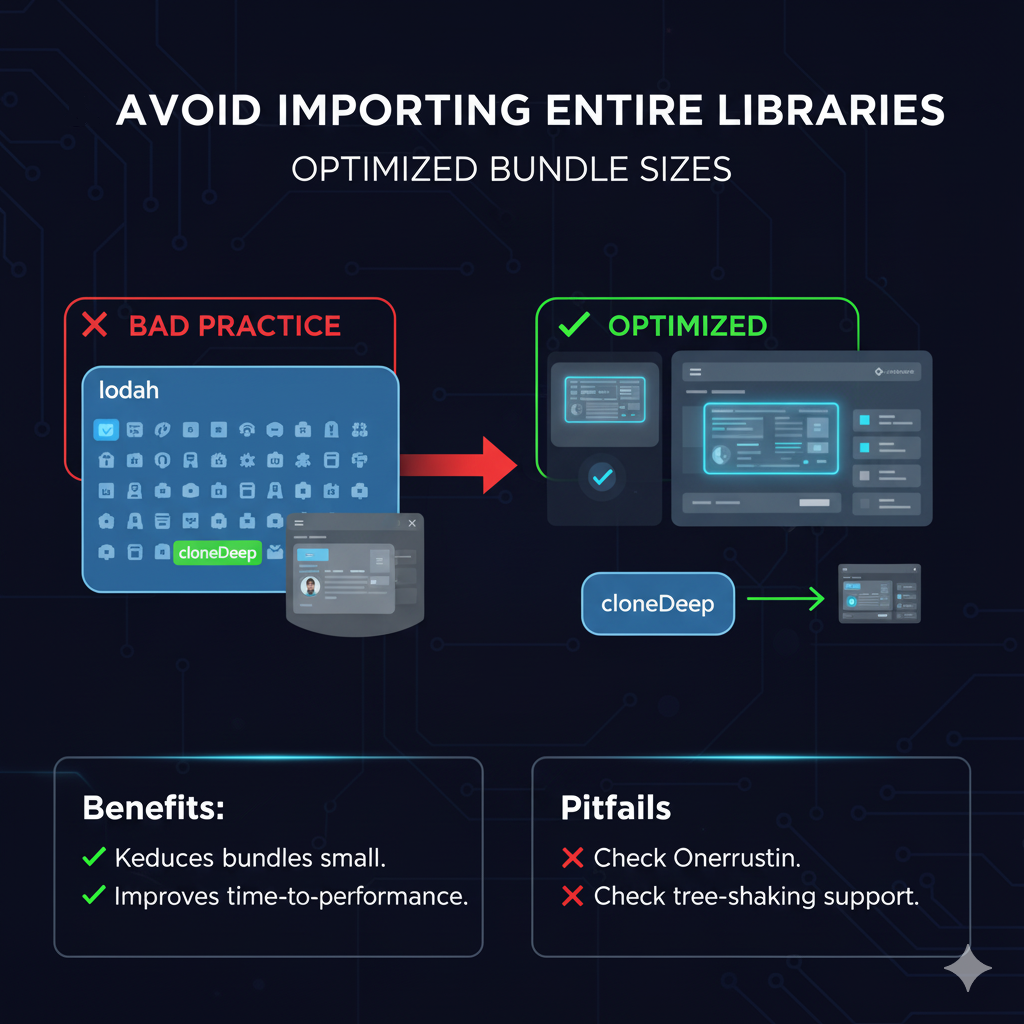
Benefits: – Keeps bundles small. – Improves load performance.
Pitfalls: – Always check tree-shaking support of third-party libraries.
4. Optimize Change Detection with OnPush (Angular 2+)
Why OnPush?
By default, Angular checks the entire component tree on any event. OnPush restricts checks to input/reference changes.
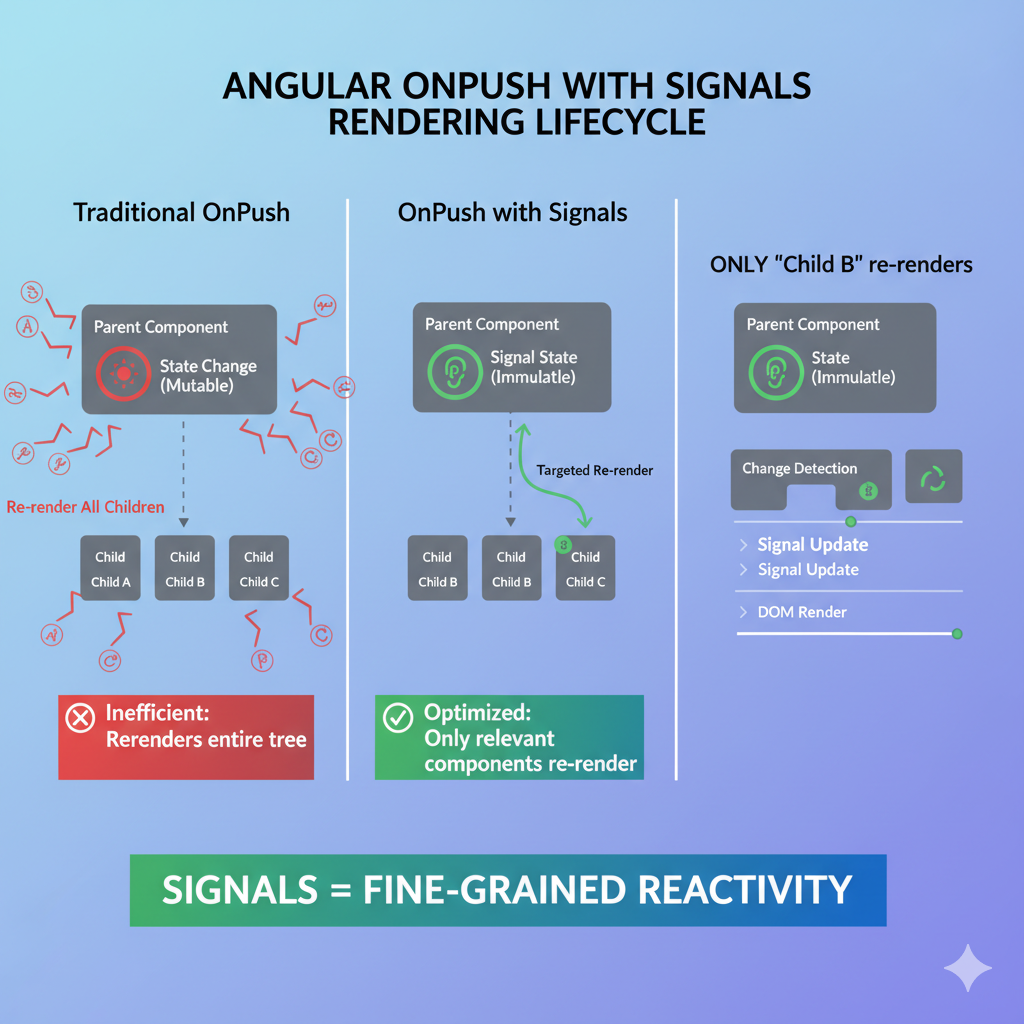
🔴 Without Signals:
@Component({
   selector: 'app-user-list',
   template: `
     <ul>
       <li *ngFor="let user of users">{{ user }}</li>
     </ul>
     <button (click)="addUser()">Add User</button>
   `,
   changeDetection: ChangeDetectionStrategy.OnPush
 })
 export class UserListComponent {
   users = ['Alice', 'Bob'];

   addUser() {
            this.users = [...this.users, 'Charlie']; // ✅ immutable update
   }
 }
🟢 With Signals (Angular 16+):
@Component({
   selector: 'app-user-list',
   template: `
     <ul>
       <li *ngFor="let user of users()">{{ user }}</li>
     </ul>
     <button (click)="addUser()">Add User</button>
   `,
   changeDetection: ChangeDetectionStrategy.OnPush
 })
 export class UserListComponent {
   users = signal(['Alice', 'Bob']);

   addUser() {
            this.users.update(u => [...u, 'Charlie']);
   }
 }
Benefits: – Fewer change detection cycles. – More predictable rendering.
Pitfalls: – Requires immutability or signals. – Avoid if the app relies heavily on mutable state.
5. Use TrackBy in NgFor (All Angular Versions)
Why?
Without trackBy, Angular destroys and recreates DOM elements even if only one item changes.
Example:
<li *ngFor="let user of users; trackBy: trackById">{{ user.name }}</li>

trackById(index: number, user: any) {
   return user.id;
} 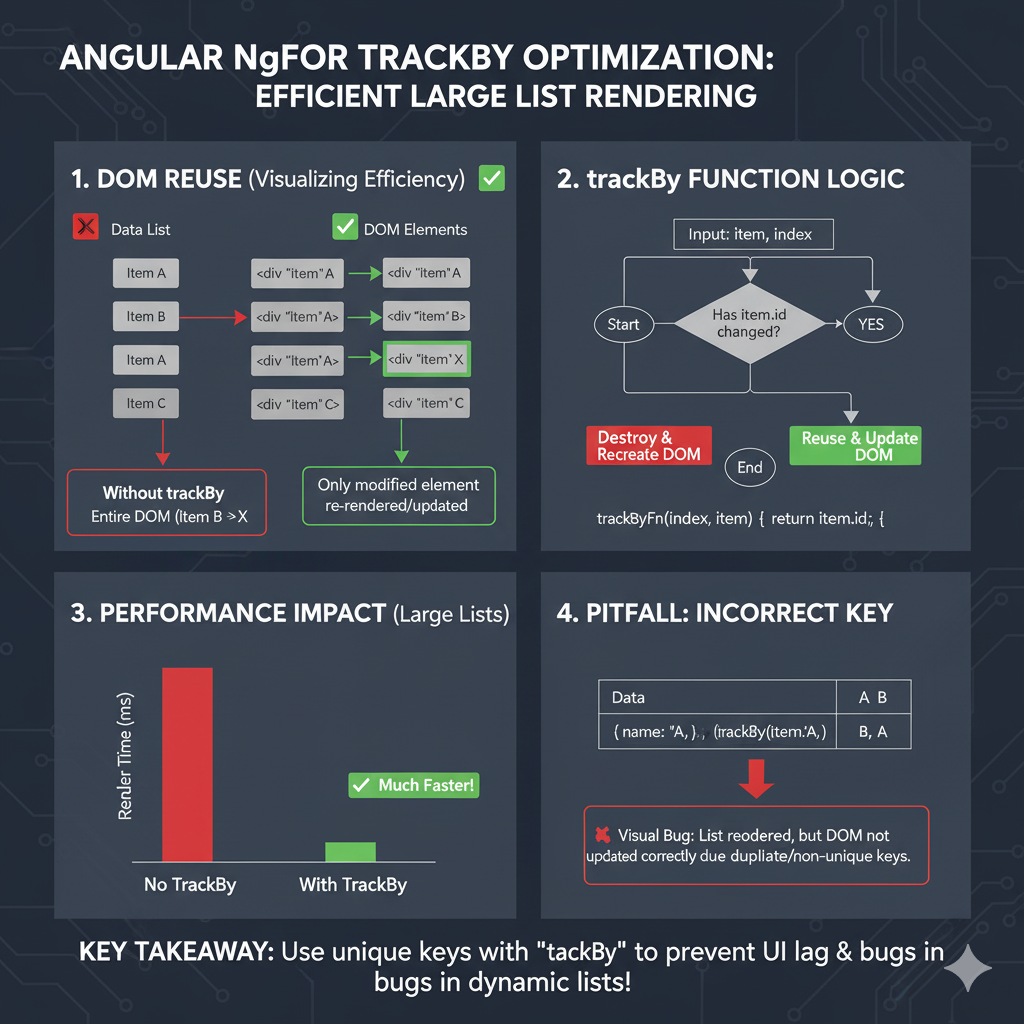
Benefits: – Reuses DOM nodes. – Improves performance in large lists.
Pitfalls: – Wrong trackBy logic can cause incorrect DOM reuse.
6. Use Standalone Components (Angular 14+)
What are they?
Standalone components eliminate NgModule boilerplate.
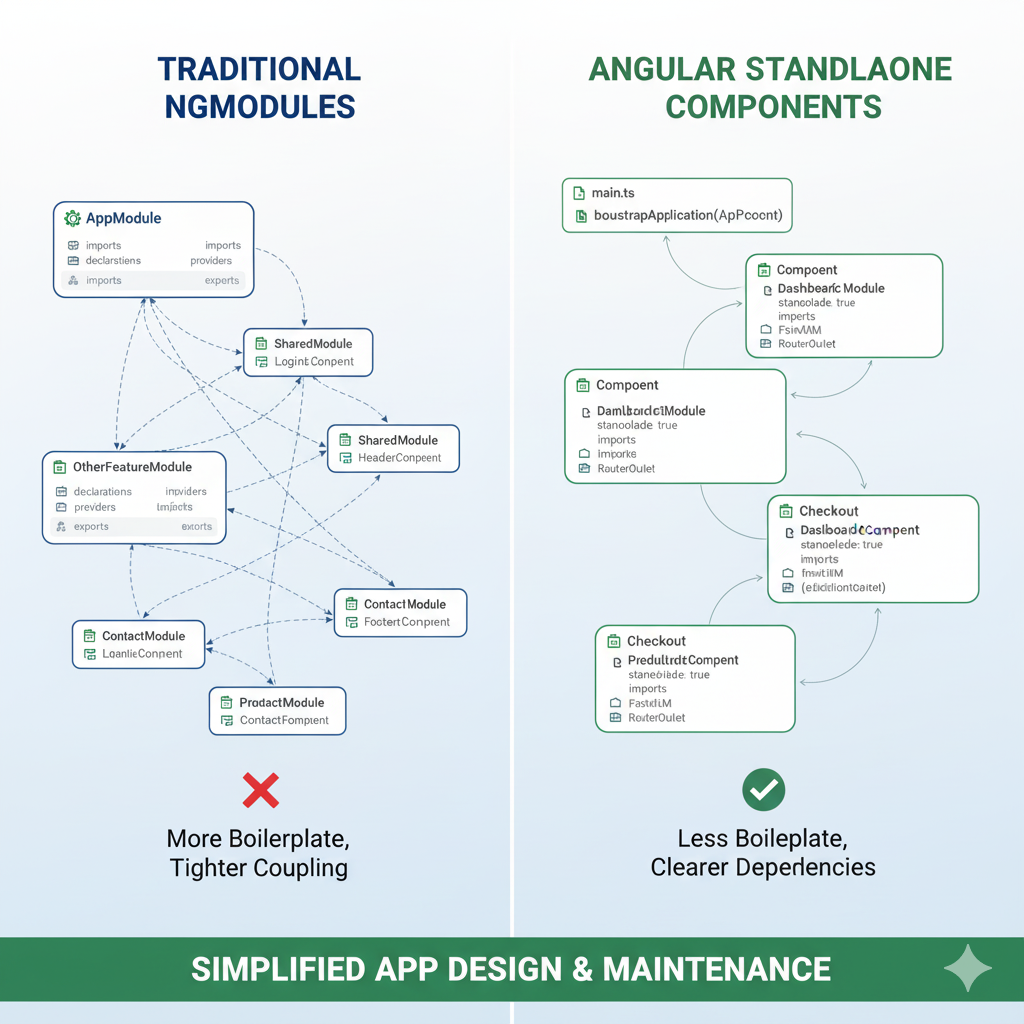
Example:
import { Component } from '@angular/core';

import { MatButtonModule } from '@angular/material/button';

@Component({

  standalone: true,

  selector: 'app-hello',

  template: '<button mat-button>Click Me</button>',

  imports: [MatButtonModule]

})

 export class HelloComponent {}
Benefits: – Simpler architecture. – Faster compilation. – Module-less design.
Pitfalls: – Mixing standalone and traditional NgModules may confuse teams.
7. Minimize Use of AsyncPipe (All Angular Versions)
Why?
Each | async in a template subscribes independently.
❌ Bad Practice:
<p>{{ user$ | async }}</p>
 <p>{{ user$ | async }}</p>
✅ Optimized:
<ng-container *ngIf="user$ | async as user">
   <p>{{ user.name }}</p>
   <p>{{ user.email }}</p>
 </ng-container>
Benefits: – Subscribes once. – Prevents duplicate change detection.
Pitfalls: – If multiple pipes are needed, consider signals or memoized observables.
8. Lazy Loading and Preloading Strategies
Lazy loading defers the loading of feature modules until the user navigates to a route that requires them.
Lazy Loading (Angular 2+):
const routes: Routes = [
   { path: 'admin', loadChildren: () => import('./admin/admin.module').then(m => m.AdminModule) }
 ];
Preloading loads lazy modules in the background after the initial app load, improving navigation speed without bloating the initial bundle.
Preloading Strategies (Angular 8+):
import { provideRouter, withPreloading, PreloadAllModules } from '@angular/router';

 bootstrapApplication(AppComponent, {
   providers: [
            provideRouter(routes, withPreloading(PreloadAllModules))
   ]
 });
Custom Preloading Example:
@Injectable({ providedIn: 'root' })
 export class SelectivePreloadingStrategy implements PreloadingStrategy {
   preload(route: Route, load: () => Observable<any>): Observable<any> {
            return route.data?.['preload'] ? load() : of(null);
   }
} 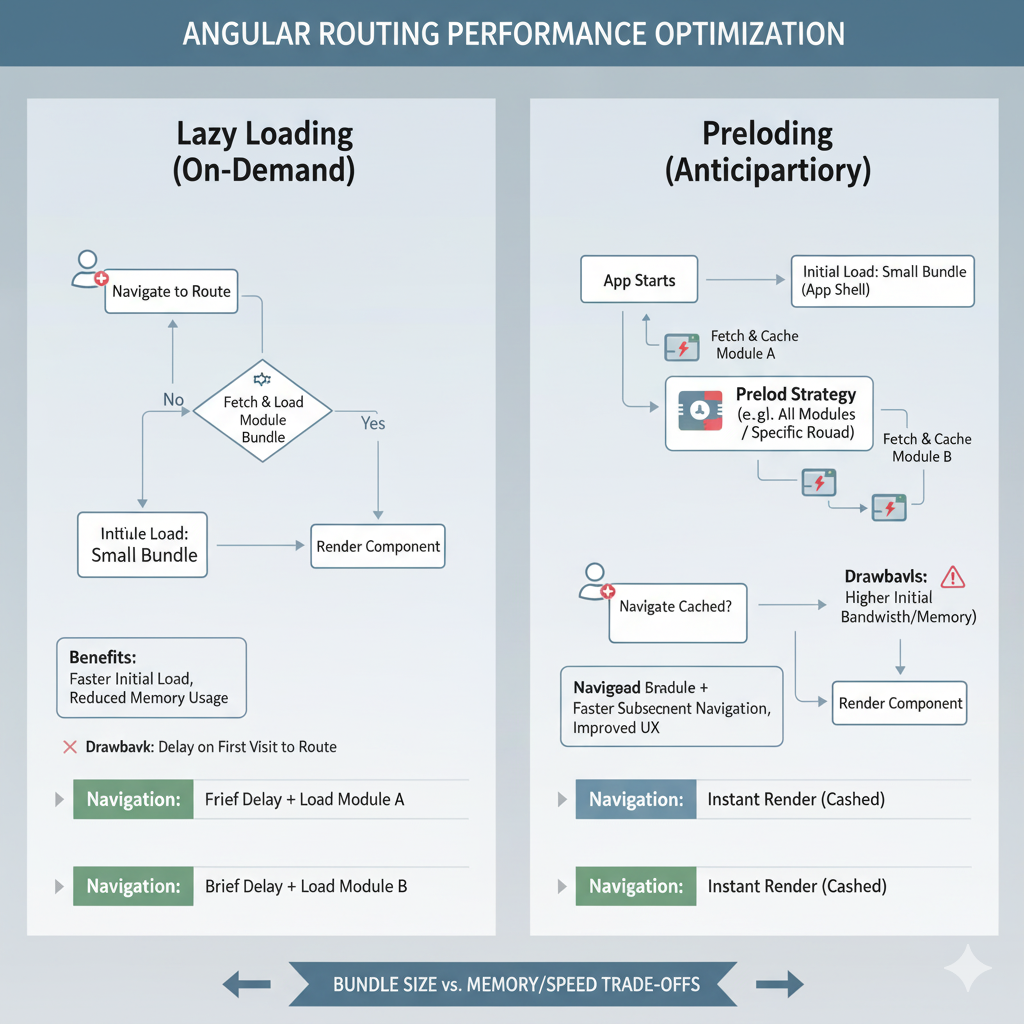
Benefits: – Lazy loading reduces initial bundle. – Preloading smooths navigation.
Pitfalls: – Over-preloading can increase memory usage.
9. Use Pure Pipes (All Angular Versions)
What?
Pure pipes recompute only when inputs change.
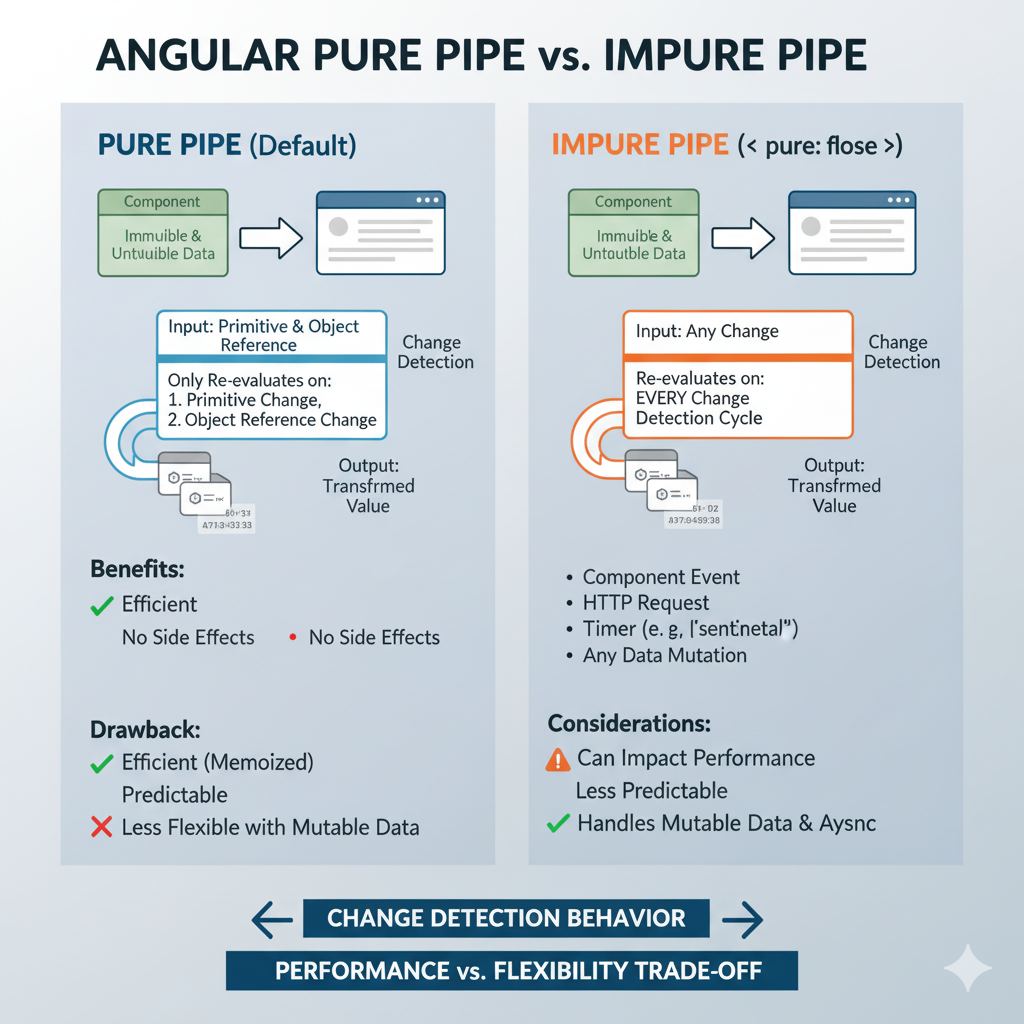
Example:
@Pipe({ name: 'capitalize', pure: true })
 export class CapitalizePipe implements PipeTransform {
   transform(value: string): string {
            return value.charAt(0).toUpperCase() + value.slice(1);
   }
 }
Benefits: – Prevents unnecessary recalculations. – Improves rendering speed.
Pitfalls: – Avoid heavy computations inside pipes.
10. Use AOT Compilation (Default since Angular 9)
Why?
Ahead-of-Time (AOT) compiles templates at build time.
Example (angular.json):
"configurations": {
   "production": {
            "aot": true
   }
 }
Benefits: – Catches template errors early. – Reduces runtime compilation overhead.
11. Optimize Bundle Size (All Angular Versions)
Techniques: – Use Angular CLI –prod builds. – Enable differential loading. – Remove unused imports. – Use source-map-explorer to analyze bundle.
Example:
ng build --configuration production
 npx source-map-explorer dist/*.js
Benefits: – Faster downloads. – Reduced memory footprint.
Pitfalls: – Avoid polyfills for unsupported browsers.
12. Implement Virtual Scroll (Angular CDK)
What?
Virtual scroll renders only visible items in a long list.
Example:
<cdk-virtual-scroll-viewport itemSize="50" class="viewport">
   <div *cdkVirtualFor="let item of items">{{ item }}</div>
 </cdk-virtual-scroll-viewport>
Benefits: – Handles thousands of items smoothly.
Pitfalls: – Requires fixed item size (unless autosize strategy is used).
13. Avoid Memory Leaks (All Angular Versions)
Common Causes: – Not unsubscribing from observables. – Forgetting to clean up global listeners.
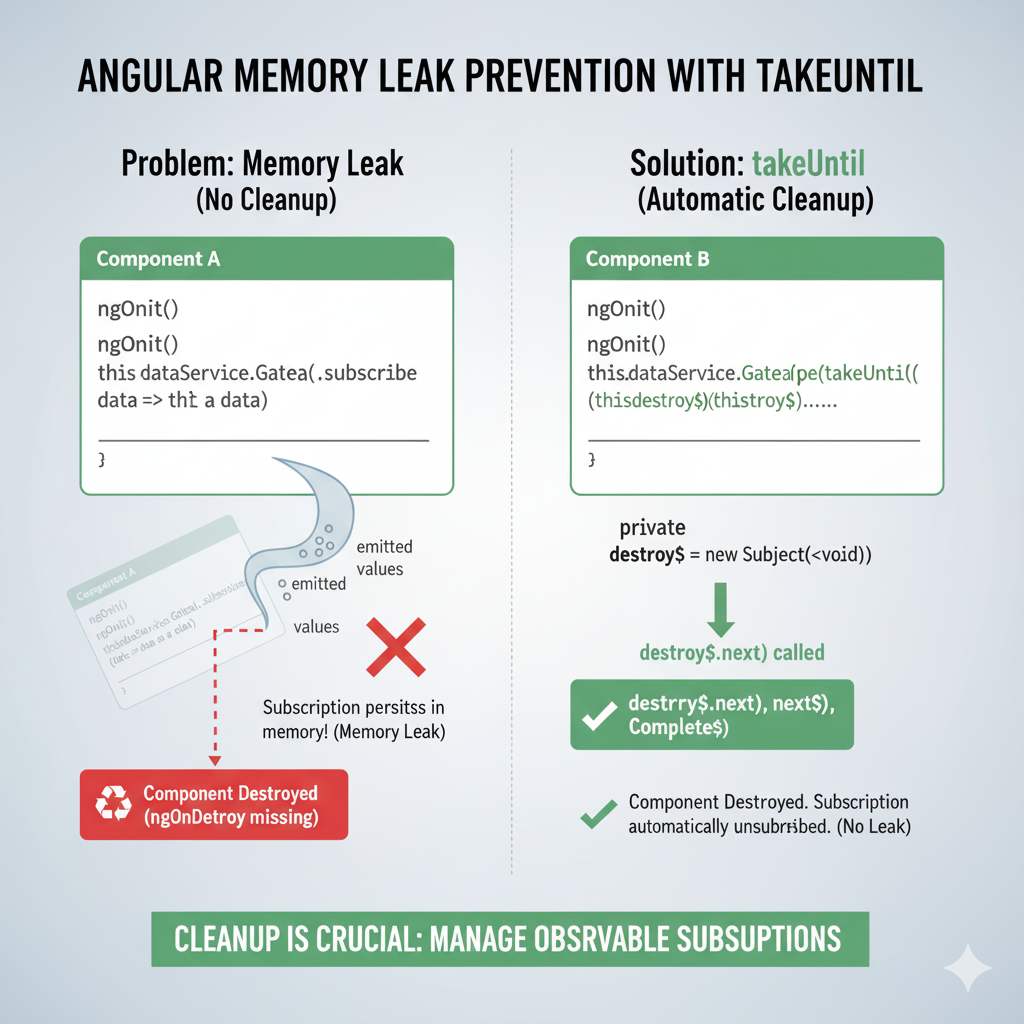
Example with takeUntil:
private destroy$ = new Subject<void>();

 ngOnInit() {
   this.dataService.getData()
            .pipe(takeUntil(this.destroy$))
            .subscribe(data => console.log(data));
 }

 ngOnDestroy() {
   this.destroy$.next();
   this.destroy$.complete();
 }
Benefits: – Prevents performance degradation. – Ensures proper cleanup.
14. Optimize Template Expressions
Pitfall: Avoid expensive function calls inside templates.
❌ Bad Practice:
<p>{{ calculateTotal() }}</p>✅ Optimized:
total = this.calculateTotal();

<p>{{ total }}</p>
Benefits: – Prevents recalculating on every CD cycle.
15. Use @if and @for for Efficient Template Control (Angular 17+)
Angular 17 introduced the new block template syntax (@if, @for, @switch) that replaces older structural directives like *ngIf and *ngFor. These are more performant and easier to read, as they compile to optimized instructions.
Example: Using @if
🔴 Old way (*ngIf with <ng-template>):
<div *ngIf="user; else noUser">

  <p>Welcome {{ user.name }}</p>

</div>

<ng-template #noUser>

  <p>No user logged in</p>

</ng-template>
🟢 Optimized way (@if):
@if (user) {

  <p>Welcome {{ user.name }}</p>

} @else {

  <p>No user logged in</p>

}Benefits:
- Cleaner syntax without extra <ng-template>.
- Compiles to more efficient runtime instructions.
Example: Using @for
🔴 Old way (*ngFor with trackBy):
<ul>

  <li *ngFor="let item of items; trackBy: trackById">{{ item.name }}</li>

</ul>
🟢 Optimized way (@for):
<ul>

  @for (item of items; track item.id) {

    <li>{{ item.name }}</li>

  }

</ul>
Benefits:
- Built-in track option avoids boilerplate trackBy
- Faster DOM updates for large lists.
- More concise and readable syntax.
✅ Best Practice:
Always use @if and @for when working on Angular 17+ projects for cleaner templates and better rendering performance.
Conclusion
Angular’s advanced features—such as signals, defer blocks, standalone components, block template syntax and preloading strategies—combined with established best practices like OnPush change detection, trackBy, and optimized imports, provide a framework for building high-performance, scalable applications.
At Techpearl, we have successfully implemented these techniques across multiple enterprise projects. This has resulted in reduced bundle sizes, improved application responsiveness, and better scalability under increasing workloads. These practices continue to play a critical role in ensuring that our Angular solutions deliver long-term performance and maintainability for our clients.


